Although Firmata is a very complete firmware for the Arduino board, from time to time we find ourselves needing extended funcionalities and wanting to use devices not supported by default by the protocol, such as LCD screens.
In these cases, we are going to need to extend the Firmata firmware and build additional blocks in Snap4Arduino that mirror these new functionalities.
Take in account this is a tutorial for advanced users. Modified firmwares for different devices will soon be featured in our official site along with their Snap4Arduino XML files containing the corresponding new blocks.
Modifying StandardFirmata.ino
In this example, we are going to modify the firmware so it can receive a new command that just turns a digital pin on. This functionality is of course completely useless, but is easy enough to understand and can be the foundation for any other complex behavior we need to implement.
Long story short, we just need to add a new case into the switch statement that takes care of SYSEX-based commands. Look for the sysexCallback function around line 320, and add the following code at the end of the switch block:
case 0x08:
    digitalWrite(argv[0], HIGH);
    break;
0x08 is the name of the new SYSEX command we have just added. In StandardFirmata, commands from 0x08 to 0x0F are free for us to use. argv[0] contains the first argument passed to this function, in our case it will just be the pin number. Notice how further arguments can be accessed just by increasing this index.
Believe it or not, we are done here! You can now compile and push this sketch into your board.
Building a new block in Snap4Arduino
So, how do we trigger this new command from within Snap4Arduino?
We are going to need to build a new block. To achieve this, right click on the programming canvas and select make a block...:

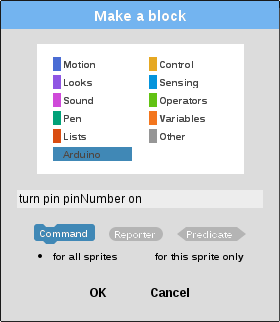
Next, select the category you want to add the block to -Arduino in our case- and type in the block name. Notice how you can type arguments here too and deal with them later.

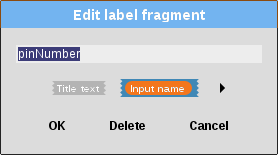
After pressing OK, click on the pinNumber label and select Input name in order to turn it into an argument:

Click OK, and get ready for the complex part. We need to trigger a firmata.js function that sends a command to the modified Firmata firmware we have pushed into our board:

Don’t panic yet! Here’s what all this means:
this.arduino.board.sppoints to the serial port to which our board is connectedwrite(new Buffer([]))is sending a data buffer through that serial port0xF0is theSTART_SYSEXcommand, which tells Firmata to expect a sysex command0x08is the command we added to Firmata beforepinNumberspeaks for itself0xF7is theEND_SYSEXcommand, which tells Firmata this sysex command is finished
We can now save the block and test it. Remember to connect Snap4Arduino to the board first:

And there you go, the LED has just been lit up!
Happy prototyping! :)


